In this article
- What makes a good invoice app for monthly billing
- Step 1 — Add a customer (and their monthly rate)
- Step 2 — Create about 20 invoices at once
- Step 3 — Open one invoice to add photos and extra charges
- Step 4 — Preview the branded invoice PDF
- Step 5 — Email all 20 invoices at once
- Step 6 — Track paid, overdue, and partial payments
- Step 7 — Draft an AI reminder email in seconds
- Watch the whole workflow (video)
- Tips for faster monthly invoicing
- Frequently Asked Questions
- Start invoicing your whole route in minutes
If you bill the same customers every month, the slowest part of running your service business is making invoices one at a time. A good invoice creator app should let you set each customer up once, then generate a whole month of invoices in a single click — dated correctly, priced automatically, and ready to email. In this guide we’ll do exactly that in Daily Invoice Maker: add a customer, create about twenty invoices at once, attach job photos and a late fee to one of them, preview the branded PDF, email the whole batch, track who has paid, and draft an AI reminder — with a screenshot of every step and a short screen-recorded walkthrough.
To keep it concrete we’ll use a sample pool-service business, Crystal Clear Pool Service, billing a route of twenty customers for the month. The exact same flow works for lawn care, cleaning, HVAC, pest control, landscaping, or any business that sends recurring invoices.
What makes a good invoice app for monthly billing
Plenty of tools can make one invoice. The ones that actually save you time do four things:
- Store a monthly rate per customer so you never re-type an amount.
- Batch-create invoices for many customers at once instead of one form at a time.
- Handle the details that come up in the real world — job photos, extra charges, and late fees.
- Send and track the whole batch, so you can see who paid, who’s overdue, and who paid part of the bill.
Daily Invoice Maker is built around that recurring-billing workflow, and it runs on Windows, Mac, Android, and iPhone with your data stored on your own device. Here’s the whole thing, step by step.
Step 1 — Add a customer (and their monthly rate)
Open the Customers screen and click Add Customer. Enter the name and service address, then the one field that makes everything else automatic: the Monthly Rate. That rate becomes the customer’s recurring bill, so you’ll never type the amount again when you invoice them.
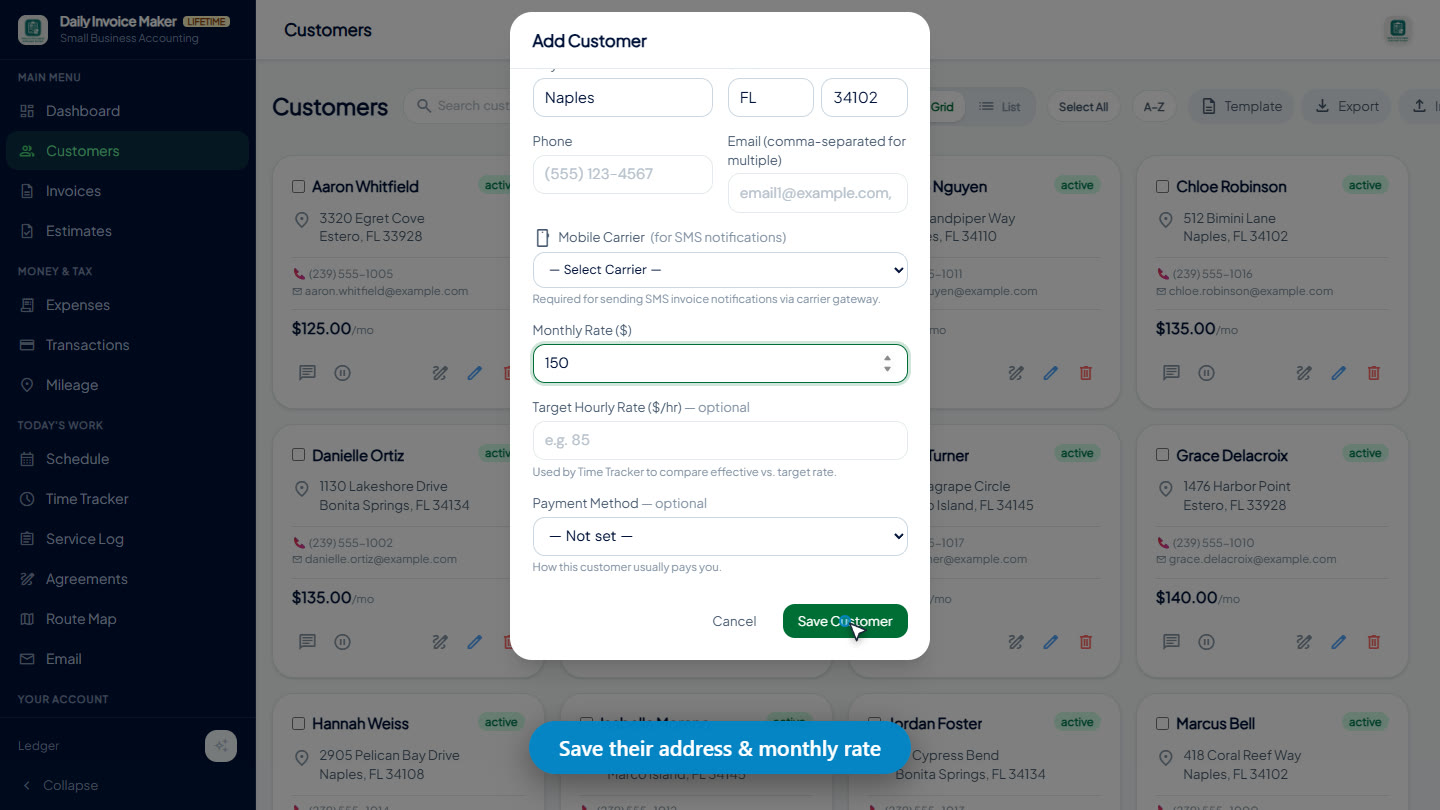
Do this once per customer. In our example the route already has nineteen customers on file, and we just added the twentieth.
Step 2 — Create about 20 invoices at once
Now for the part that saves the most time. On the Invoices screen, click Create Invoice and choose Multiple invoices at once — the option made for monthly service billing. Tap Select All Active Customers to check every customer on your route (here, all twenty).
Because each customer has a monthly rate saved, you leave the line-item amount blank and the app fills in each customer’s own rate automatically. One shared line item — “Monthly Service” — becomes twenty correctly-priced invoices.
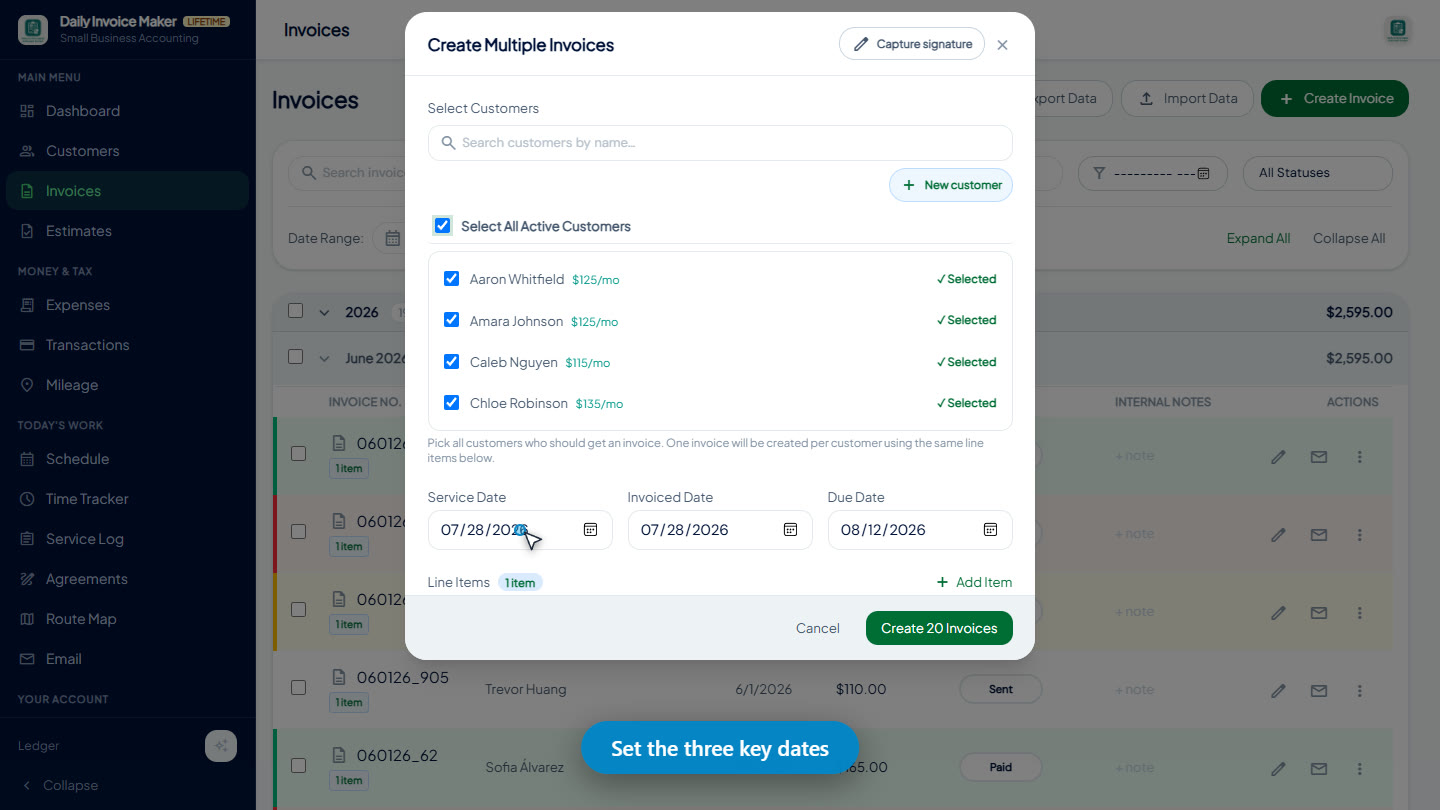
How to set the Service Date, Invoiced Date, and Due Date
Every invoice carries three dates, and getting them right keeps your books — and your customers — clear:
- Service Date — the day the work was actually performed. This is what the invoice is for, and it’s what groups the invoice into the correct service month.
- Invoiced Date — the day you’re billing, i.e. when the invoice is issued. Usually today.
- Due Date — the day payment is expected. Daily Invoice Maker defaults this to fifteen days out (net-15), and you can change it to net-30 or any date you like.
Set the three dates once and they apply to the whole batch. Then click Create 20 Invoices — every invoice is generated in a second, each with that customer’s monthly rate and your chosen dates.
Step 3 — Open one invoice to add photos and extra charges
Any invoice can be customized after it’s created. Click Edit on one of the new invoices to open it.
Attach photos of the work
In the Invoice Pictures section, use Upload Pictures or Add Photo to attach before-and-after shots of the job. They’re compressed automatically, and you can drag to reorder or resize them — proof of work, right on the invoice.
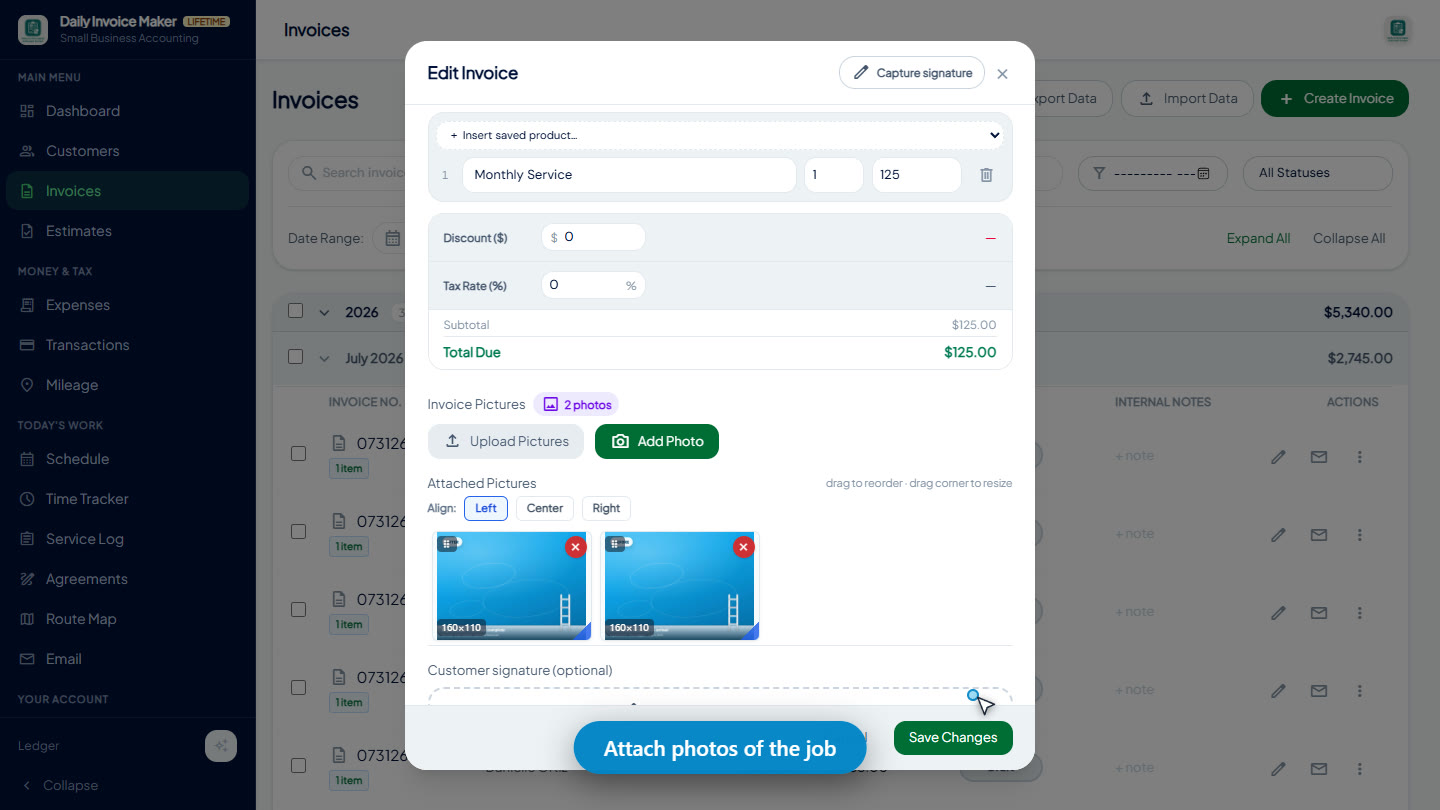
Add a late fee (or any extra charge)
Click Add Item to add a second line beyond the regular monthly charge. Here we add a Late fee — June balance past due of $25 on top of the $125 monthly service, and the total updates to $150 automatically. Use the same trick for one-off repairs, extra visits, or parts.
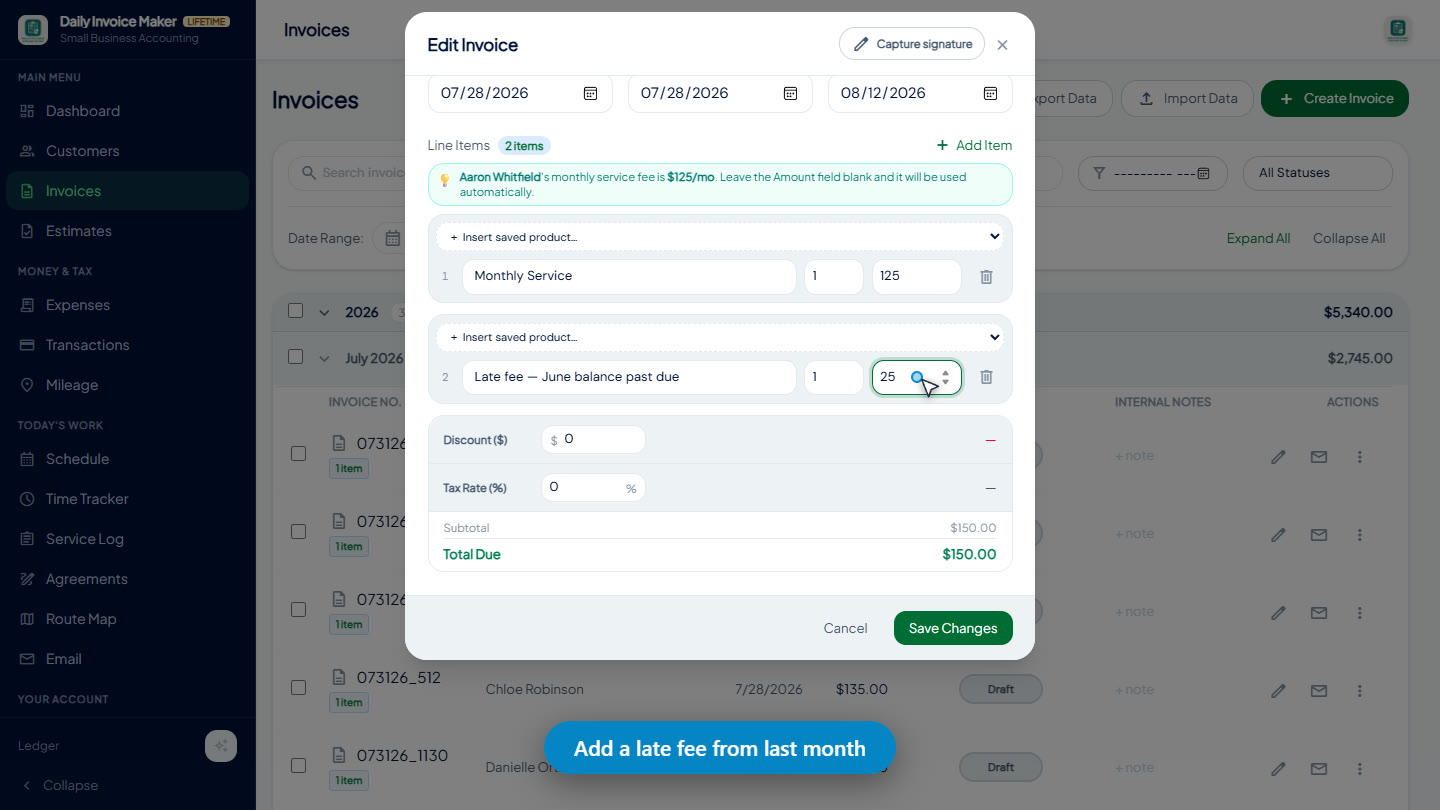
Step 4 — Preview the branded invoice PDF
From the invoice’s ⋮ menu, choose Print or Download PDF to see the finished invoice. Your business logo sits at the top, the two line items and total are laid out cleanly, and the attached job photos appear in their own section — a professional document you’d be happy to send.
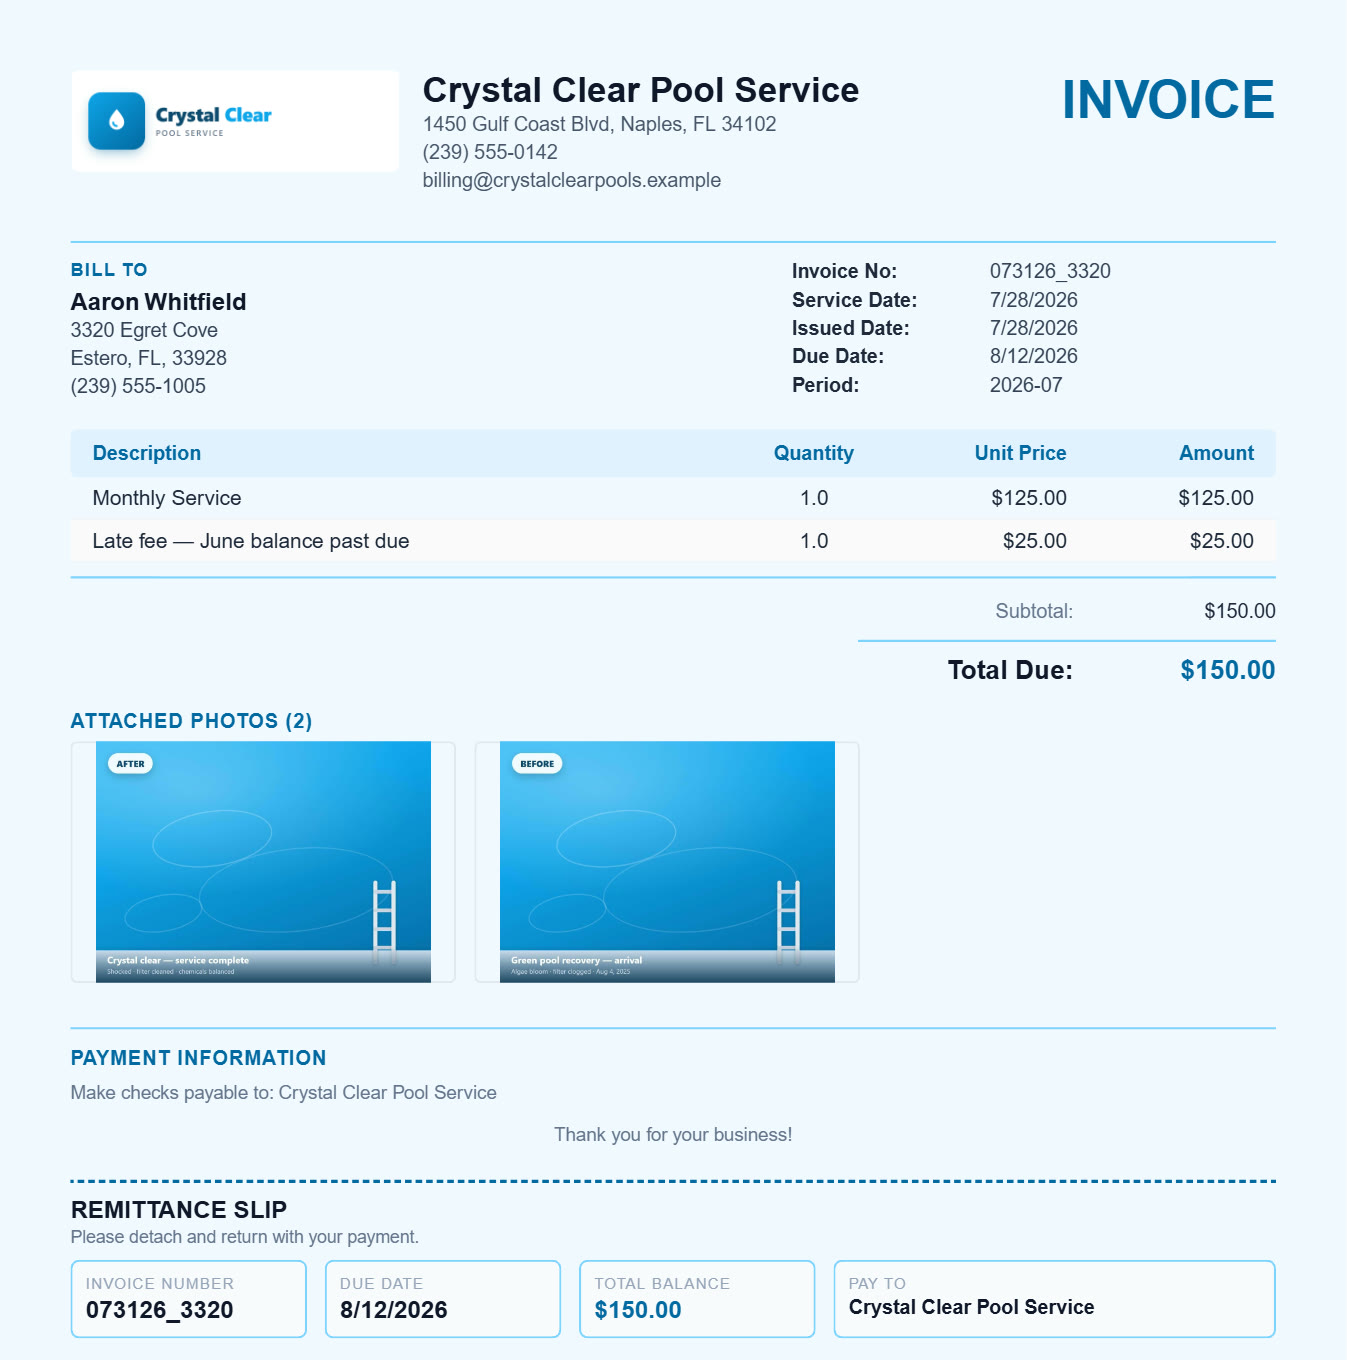
📄 See the actual invoice PDF this produced (sample) — logo, line items, total, and photos, exactly as your customer would receive it.
Step 5 — Email all 20 invoices at once
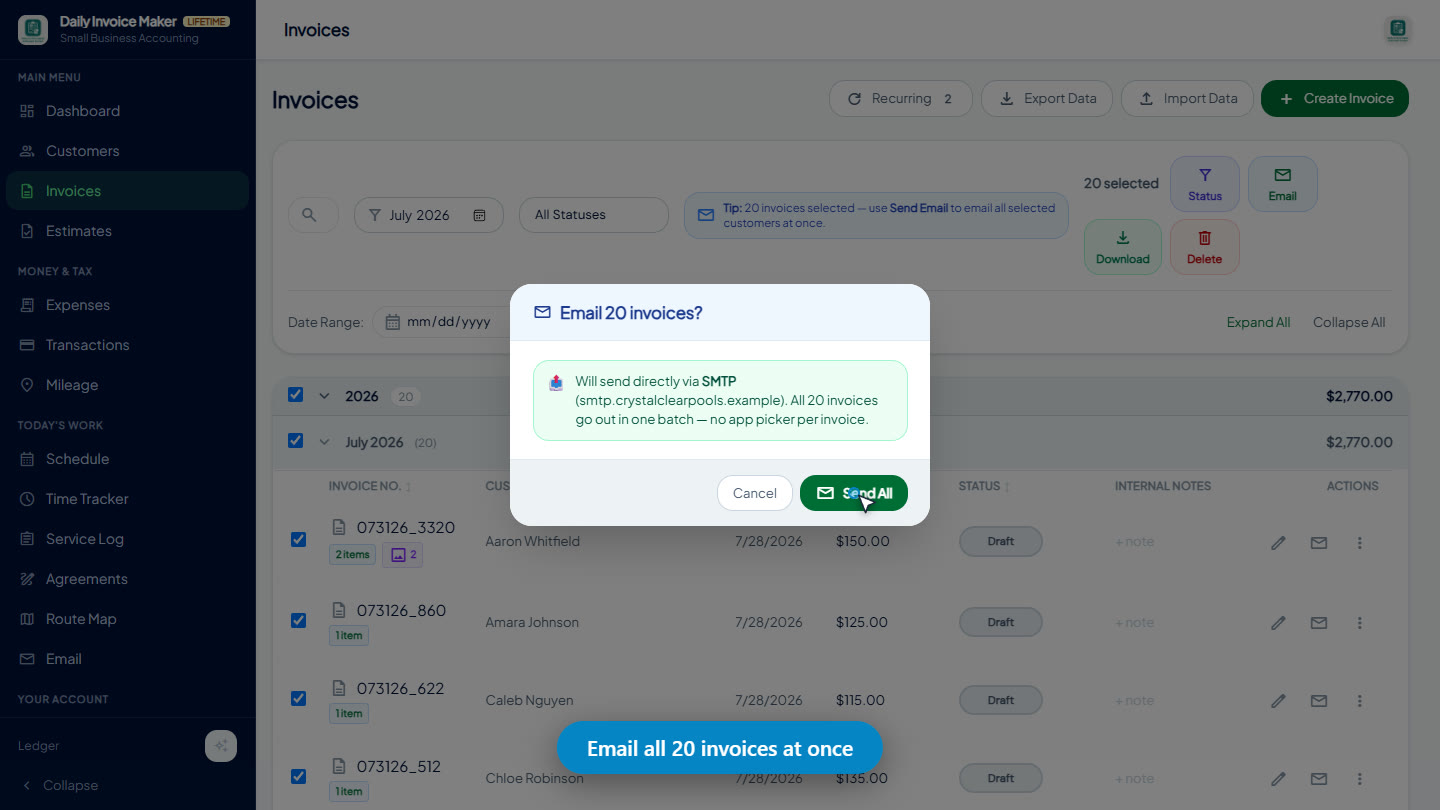
Back on the Invoices list, filter to the current month and select the whole group with one checkbox. The bulk toolbar appears — click Email, confirm, and Send All. With SMTP connected, all twenty invoices go out in a single batch, each PDF attached and addressed to the right customer. No app picker per invoice, no copy-and-paste.
Step 6 — Track paid, overdue, and partial payments
As money comes in, keep the whole route’s status on one screen. Each invoice has a colored status you can change in a tap:
- Paid (green) — settled in full.
- Overdue (red) — past the due date and unpaid.
- Partial Paid (amber) — a partial payment recorded, with the paid amount and remaining balance shown on the row (for example, Paid $67.50 / Bal $67.50).
- Sent — delivered and awaiting payment.
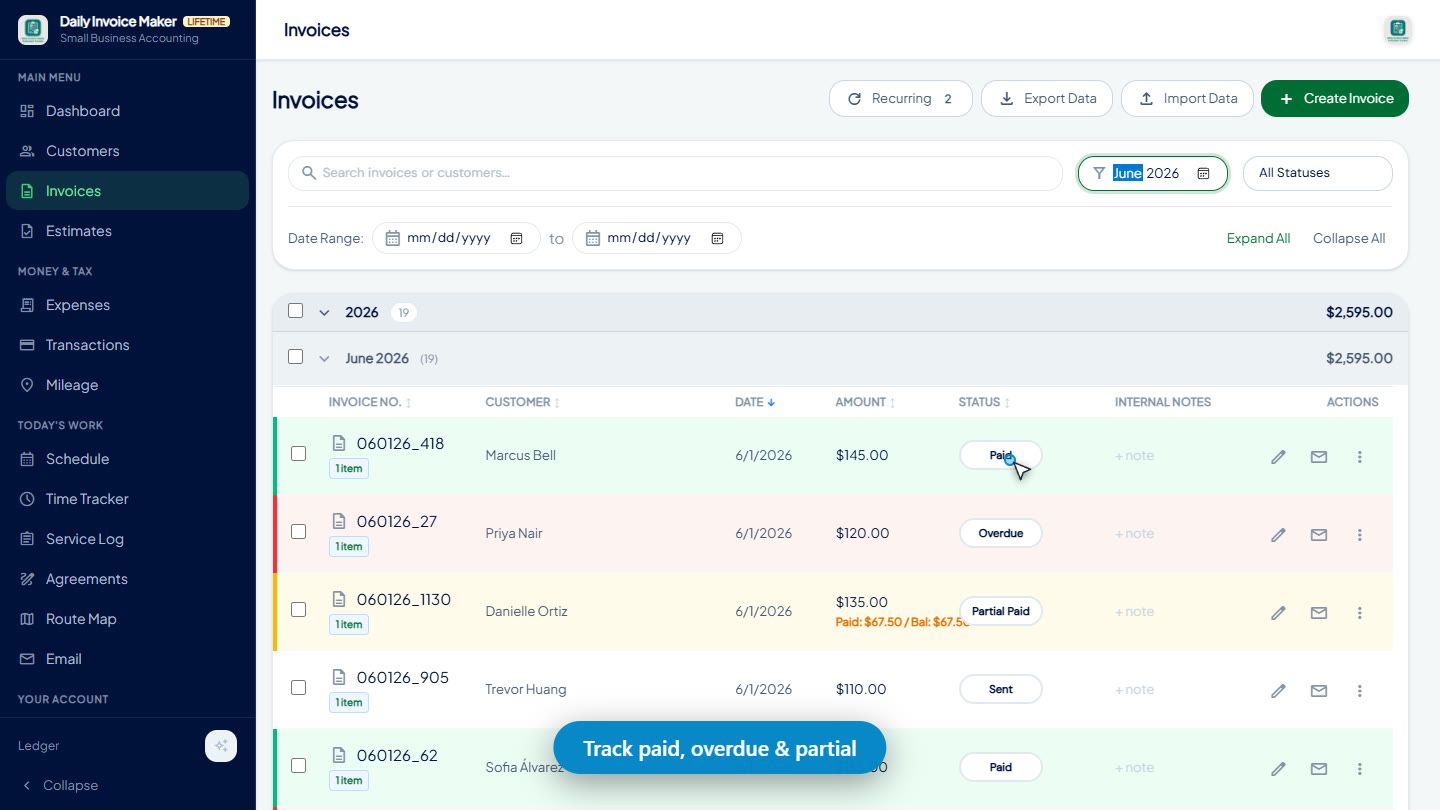
At a glance you can see exactly who to follow up with — which leads perfectly into the last step.
Step 7 — Draft an AI reminder email in seconds
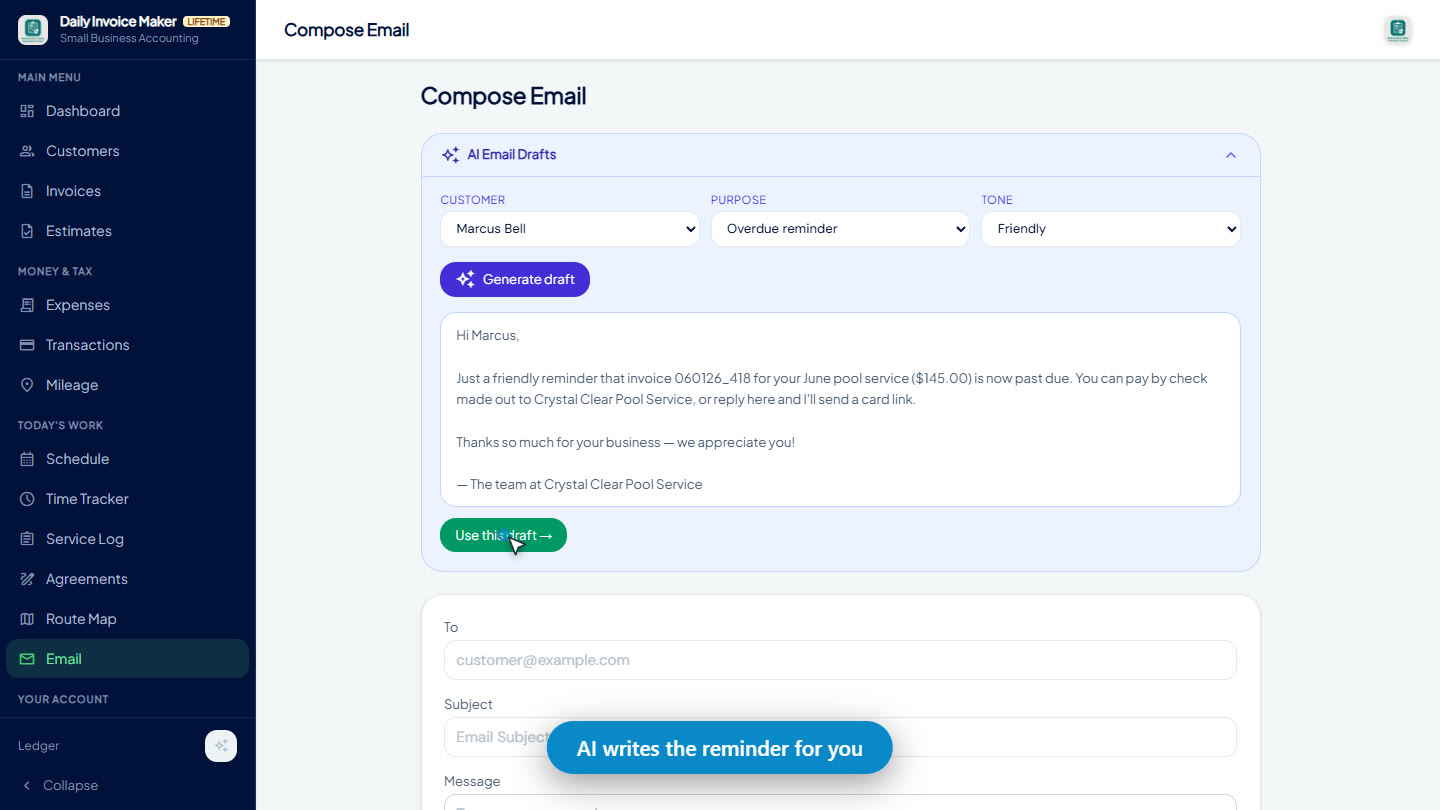
When a customer is late, you don’t have to write the awkward “you owe me” email yourself. Open the Email screen, pick the customer, choose the purpose (Overdue reminder) and a tone (Friendly), and click Generate draft. The AI Email Draft writes a polite, ready-to-send reminder that references the specific invoice and amount — then click Use this draft to drop it into the composer and send.
Watch the whole workflow (video)
Here’s every step above — add a customer, create twenty invoices, set the dates, attach photos and a late fee, preview the PDF, email the batch, track payments, and draft a reminder — screen-recorded in the real app with narration:
Tips for faster monthly invoicing
- Set the monthly rate when you add the customer. It’s the single input that makes batch invoicing automatic.
- Bill the whole route on the same day each month. Select all, set the three dates once, and create the batch in one click.
- Attach photos as proof of service. Before-and-after shots reduce disputes and make your invoices look professional.
- Carry late fees onto the next invoice. Add a clearly-labeled line item so the customer sees exactly what the extra charge is for.
- Watch the status colors, not a spreadsheet. Overdue in red and partials in amber tell you who to nudge without any manual tallying.
Frequently Asked Questions
What is the best invoice app for a monthly service business?
The best fit for recurring billing is an app that stores a monthly rate per customer and can create many invoices at once. Daily Invoice Maker does both: set each customer’s rate once, then generate a whole month of invoices — twenty, fifty, or more — in a single click, each priced and dated automatically.
How do I create multiple invoices at once?
On the Invoices screen choose Create Invoice → Multiple invoices at once, tap Select All Active Customers, set your Service, Invoiced, and Due dates, and click Create N Invoices. Leaving the amount blank uses each customer’s saved monthly rate, so every invoice is correctly priced.
What’s the difference between the Service Date, Invoiced Date, and Due Date?
The Service Date is when the work was done, the Invoiced Date is when you bill it, and the Due Date is when payment is expected. The app defaults the Due Date to fifteen days after invoicing, and you can change any of the three.
Can I add photos and extra charges to an invoice?
Yes. Open any invoice, attach job photos in the Invoice Pictures section, and click Add Item to add extra lines such as a late fee, a repair, or parts. The total and the PDF update automatically, and the photos appear on the finished invoice.
Can I put my business logo on the invoice?
Yes. Upload your logo once in Settings and it appears at the top of every invoice PDF, alongside your business name, address, and payment details.
How do I track which invoices are paid, overdue, or partially paid?
Every invoice has a color-coded status — Paid, Sent, Overdue, or Partial Paid — that you can change in one tap right from the list. Partial payments show the amount paid and the remaining balance on the row, so you always know who still owes what.
Can the app write payment-reminder emails for me?
Yes. The AI Email Draft feature writes a friendly, professional reminder for a chosen customer and purpose (such as an overdue reminder), referencing the specific invoice and amount. You review it, then send.
Do I need a subscription to make invoices?
Daily Invoice Maker offers a free version to try every feature, and a one-time or low monthly upgrade removes limits and the sample watermark. Your data stays on your own device.
Start invoicing your whole route in minutes
A month of invoicing that used to take an afternoon becomes a few minutes: add your customers once, create the batch, attach anything that’s special about a job, email everyone, and watch the payments land. Download Daily Invoice Maker for desktop or mobile and send your first batch of invoices today.
Two things we got wrong first when we built monthly billing, in case you are setting this up anywhere: bill on a fixed calendar date rather than a rolling 30 days, or by month eight you are invoicing on the 24th and customers stop recognising the charge. And decide up front what a scheduled invoice should do in a month you did not service — silently skipping it is rarely what you want.
Daily Invoice Maker keeps all your data on your device. This article is for general information only.
Run a service business?
Daily Invoice Maker handles invoices, estimates, expenses, route maps, agreements, and tax reports — offline, on Windows, Mac, Linux + Android. Free demo, lifetime license available.
Download free →